
Overview
Group Management is a feature that allows administrators to configure groups and assign users and instances to those groups.
This feature provides clients with greater control and flexibility when provisioning user access to their Instances and includes support for 7216 consent for offshore staffers.
Configuration
Clients who wish enable group management will need to work with their Customer Success Manager. The CSM will:
- Request a list of emails for the users who will be the administrators of Group Management.
- Enable the group management feature in the K-1 Aggregator admin app.
- Add the list of admin users
Group Setup
Once group management is enabled, administrators will have access to the Tenant Group Management page in K-1 Aggregator.
On this page, administrators will be able to do several things to set up their groups:
Add Group
The Add Group button will allow administrators to manually create a group with an entered group name and can indicate if the group is an offshore group. Whether or not a user is allowed access to an instance will depend on a number of factors, explained here.

Export/Import Users
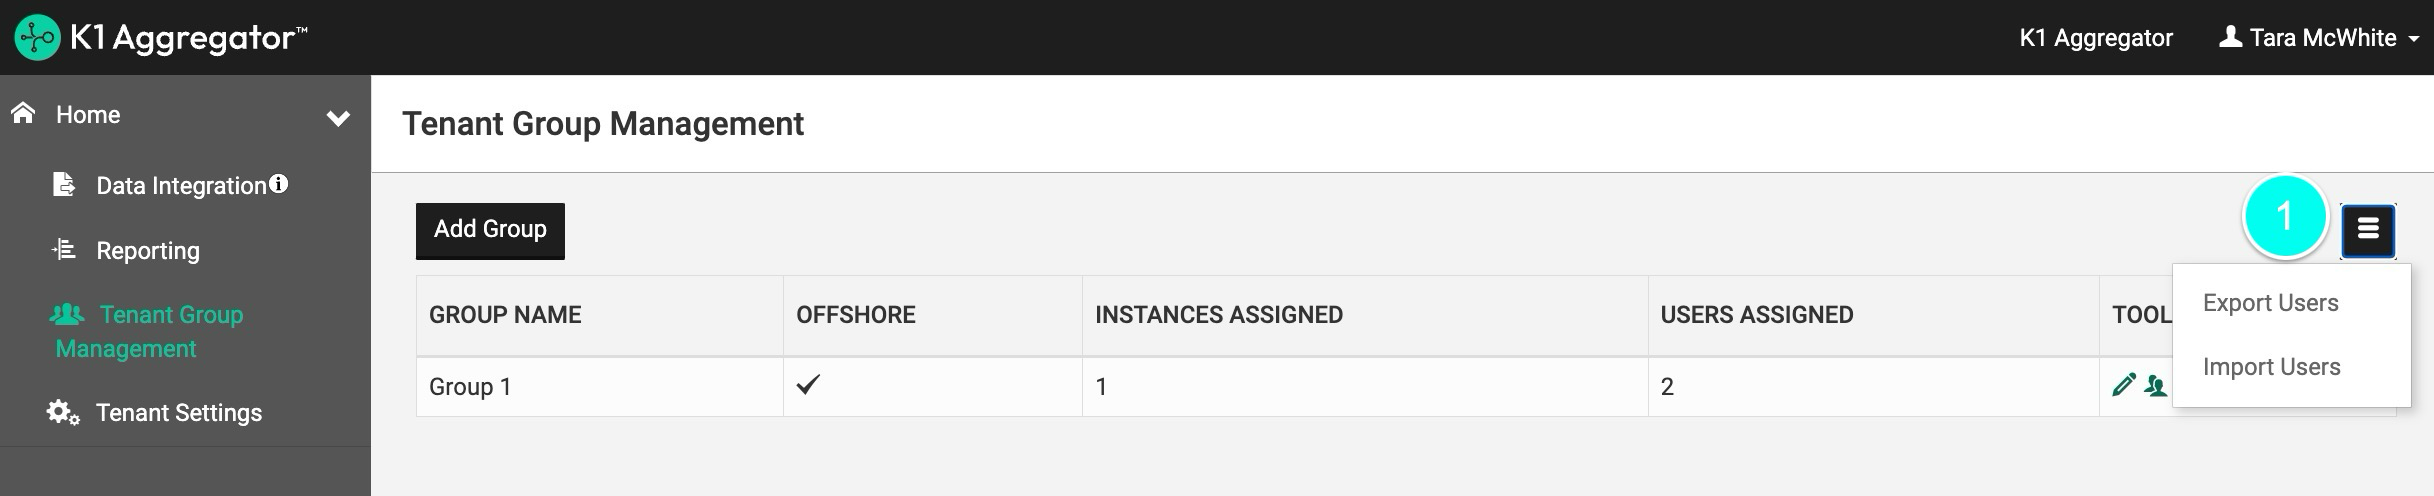
Exporting users will export the entire list of groups and users to Excel. Each row of the export will include the group name and the email. If multiple users exist in a group, the group name will be repeated for each user email. If the same user email is part of multiple groups, the email will be listed for each group.
Importing users will only work for group names that currently exist. Groups will need to be manually added first, prior to using the import functionality. If an imported group name matches an existing group and the user email does not currently belong to that group, the user email will be added.
Importing does not currently support creating new groups, or removing user emails.
Group Tools

For each group listed, certain actions can be taken:
- Edit: Edit the group name or offshore indicator.
- Assign Users: Manually add or remove user emails for the group.
- Assign Instances: Manually assign or remove the group to/from instances. Both the tax year and instance must be selected.
- Delete: Delete the group and all users assigned to the group. Note that this will impact user access for any instances and users in that group.
Instance Settings
Once group management is enabled, administrators will have access to a Group Management Settings area in Instance Settings. From here, three main things can be configured for the instance:
- Indicate if there is a signed 7216 consent on file for the legal entity.
- Specify the expiration date for the 7216 consent.
- Add/Remove groups for the instance.
- This functionality is the same as from the Tenant Group Management page.
Understanding User Permissions
If group management is enabled, access to instances is secured based on role, group, and 7216 consent. Administrators will always have access to everything.
Non-administrator users:
- Can access individual instances they have been added to (*as long as they are added to at least one group)
- Cannot create instances
- Cannot access Tenant Group Management or Tenant Settings
- Cannot access Group Management Settings on instance settings
- Can access Data Integrations (when enabled for the tenant)
- Will not see the following options in the tenant dashboard dropdown:
- Import CCH Instances from Excel
- Download Import Template
- Import Standard Template
- Export All Instances
- Export Selected Instances
Non-administrators have access to instances based on the following logic:
- If the user is not part of any group, they will have access to all instances.
- If the user is part of a group and that group is not marked as 'Offshore', the user will only have access to instances that are assigned to that group.
- If the user is part of an Offshore group, the user will only have access to an instance if:
- The user's group has been associated to that instance.
- The instance has the 7216 consent flag on.
- The current date has not passed the instance's 7216 consent expiration date.
New users not added to a group will have access to all instances. Please add users to the appropriate group before requesting the user be provisioned.
Provisioning Administrator Users
You can reach our support team by clicking on the "Get Help" button in the application or here in the Help Center.
Provisioning Non-administrator Users
- Add users to the appropriate group (this step will not provision the user)
- You can reach our support team by clicking on the "Get Help" button on our apps or here in the Help Center to request provisioning a new user account
- Include First Name, Last Name & Email Address
Please review this article before requesting Group Management be disabled:
Behavior When Disabling Group Management Without Clearing Existing Group Assignments